Showing posts with label Technique. Show all posts

Wednesday, March 16, 2011

Hello!

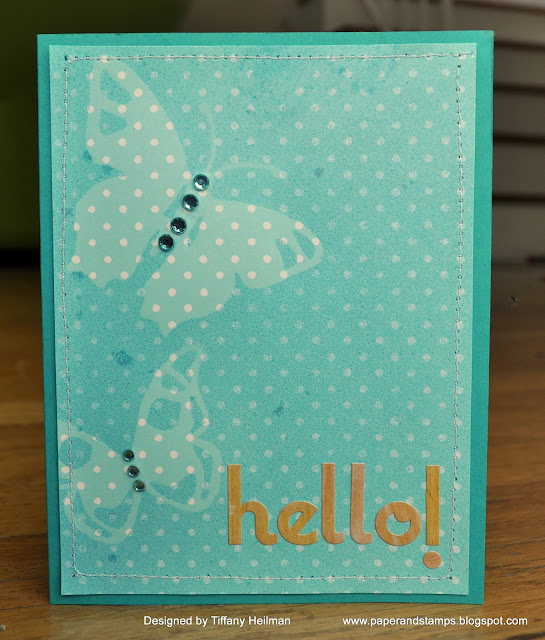
It is reject week here on the ole blog.  Here is another card that didn't make the cut for the last Go To Sketches publication call.  I made this card using sketch 65 to create this card.  I used butterfly masks and mists to create the background.  I wanted to add a little contrast so I finished off the card with woodgrain letter stickers.


Supplies:
Paper: Bermuda Bay cardstock (SU!); Patterned Paper (Memory Box)
Stamps: None
Ink: None
Extras: Sky Blue Mist (Tattered Angels); Woodgrain Stickers (Pink Paisley); Butterfly Mask (Heidi Swapp); Bling (Kaiser Crafts)

Sunday, March 13, 2011

Wedding Wishes

I created this card using Sketch 65 from the latest Go To Sketches publications call.  Alas it was rejected, but I figured I would submit it for the Paper Pieced challenge over at the Moxie Fab blog.  The rose and leaves were stamped on patterned paper, cut out and layered.  I really liked this card, but some cards just don't make the cut :) 


Supplies:
Paper: solar white cardstock(Neenah); patterned paper (Crate Paper)
Stamps: Year of Flowers: Roses and Giga Guidelines (PTI)
Ink: Tuxedo Black (Momento)
Extras: Black Marker (Zig)

Wednesday, March 2, 2011

Paper Pieced Rose

I should start this post with a disclaimer

**This is going to be a Moxie-tastic week on the blog.  All posts are for Moxie Fab Blog challenges, because they are so fun.  You really have to play along!!!

This card was created for the Stamp It! Techniques Paper Piecing Challenge.  I stamped the rose on some Indie Girl paper by Sassafras and leaves on Jillibean Soup paper.  I cut out the roses and leaves, shaded them with copics, layered them, attached the flowers to the card front, and finally added  some random glitter (which didn't photograph that well).  Glitter makes everything better!!!! 

Hope you are having a great week.


Supplies: 
Paper: Pacific Point cardstock (SU!); Pink and grid patterned papers (Indie Girl collection by Sassafras); green patterned papers (Pasta Fagioli collection by Jillibean Soup)
Ink: Tuxedo Black (Momento)
Stamps: Year of Flowers: Roses (PTI)
Extras: Dazzling Diamonds Glitter (SU!); Gray Markers (Copic)

Monday, February 28, 2011

Bicycle Friend

As I have said before I love Moxie Fab Blog Challenges - Cath is the hostess with the mostess!

One of the many challenges going on for technique week is Stamping with Shimmer Sprays.  For this challenge I used mists in two ways: 1) misting ribbon, 2) misting an embossed image.

To create the main image I embossed the bicylce in white on patterned paper.  I sprayed blue mist on the bike and then wiped it off to make sure the white really shows through, which adds a fun spotlight to the bike.  I wanted to draw a little more attention to the bike so I used liquid pearls and green glitter to the flowers in the basket.


Supplies:
Paper: Watercolor cardstock (Archiver's); Pool Dot patterned paper (Memory Box)
Ink: Watermark (Versamark)
Stamps: Bicycyle (Hero Arts)
Extras:  Seam binding Ribbon; Detail White embossing powder (SU!); Rose Red (Liquid Pearls); Green Stickles (Ranger Ink); Sky Blue and Yellow Daisy Glimmer Mist (Tattered Angels); Buttermilk Cream mist (Maya Road) alphabet stickers (Making Memories)

Sunday, February 27, 2011

Birthday Wishes with Tape

It has been a whirlwind since my last post.  I have been so busy at work I didn't even have time to post some fun (and dare I say cute) cards that I made over Marisa's last weekend.  I absolutely love the challenges over at the Moxie Fab blog.  One of the challenges is Getting Daring with Decorative Tape, and since I love washi tapes I had to play along.  I created three flowers of different sizes, blinged them out with some rhinestone brads that I have been hoarding (I can't help it they are just so pretty) and layered them on the scrolled die-cut background.  I mixed up my tapes by using 1 fabric and two of the different patterns of washi tape.


Supplies:
Paper:  Early Espresso cardstock (SU!); Watercolor cardstock (Archiver's); Pool Dot patterned paper (Memory Box)
Stamps: Sentiment from Giga Guidelines (PTI)
Ink: Aqua Mist (PTI); Early Espresso (PTI)
Extras: Washi Tapes (mt deco); Fabric Tape (e2 daily); Rhinestone brads and Scroll die (SU!)

Monday, February 7, 2011

A Little Lift

Paper Makeup Stamps is turning 2 years old!  And to celebrate the occasion, they are having a super fun VIP blog hop with the theme "the things we love".  The entire design team invited special crafters to play along in this hop.  You should have arrived from Randee's blog, who so kindly invited me to play along.  If not go to the Paper Makeup Stamps company blog for a master list as well as to enter yourself to win a super fabulous prize!

Since the theme is things we love, I just had to use the Oo La La Corset set.  Before your mind goes in the gutter...I should tell you the thing I love is puns! This set is not only stamps fabulously, but is so punny.  I just know whoever is feeling a little down will have an instant lift when they get this card in the mail. 

Edited to add:  I also submitted this card for the paper piecing technique challenge over at the Moxie Fab blog.


Next hop on over to Shaela's blog.

Supplies
Paper: Patterned Paper (Indie Girl by Sassafras); Solar White cardstock (Neenah); Berry Sorbet cardstock (PTI)
Stamps: Oo La La Corset and Sentiment (PMS)
Ink: Tuxedo Black (Momento)
Extras: Home Made Ribbon - Seam Binding, Blue Mist (Maya Road); Turquoise Mist (Tattered Angels); Oval and Oval Scallops Dies (Spellbinders); Copic Markers; Polka Dot Embossing Folder (Cuttlebug)

Sunday, October 31, 2010

Circle-A-Thon

Card 1
  
Card 2 

If you follow my blog you know my obsession with Hexagon-A-Thon.  Erin at Schlosser Designs is furthering feeding my obsession by release a new A-Thon set with circles.  Although I wasn't feeling well I had to play with this new set that is being released on November 3rd.  I made 2 cards.  For card one I weave Washi Tapes to make a grid/plaid background.  I added a bow and the circle is the new set.  It is acutally 3 stamps...I love all the layering possibilities.  The second card I created a gradient background using a leaf image and added some sequence ribbon.  The focal point is another layering adventure with Circle-A-Thon.  The very center is the circle that coordinates with the leaf image used to make the background.  I added 3 layers of Extra Thick Embossing powder to the very center to create my own epoxy embellishment.  The photo of the second card didn't turn out very well, since I had to take it at night. Maybe I will have to redo the card photo shoot.

Here is a close up of the epoxy embellishment.


There will be a blog hop on November 3rd showcasing the new sets being released.  Check out another peek HERE on the SD blog.

Card 1
Supplies
Paper: Whisper White cardstock (SU!); Solar White cardstock (Neenah); Green textured cardstock (DCWV)
Ink: Chocolate Chip and Cool Caribbean (SU!)
Stamps: Circle-A-Thon
Extras: Washi Tapes, Ribbon from my Stash, 1 3/4 circle punchs (EK Success)

Card 2
Supplies
Paper: Chocolate Chip and Very Vanilla cardstock (SU!); Green textured cardstock (DCWV)
Ink: Chocolate Chip, Kiwi Kiss, Old Olive, Daffodil Delight and Crushed Curry (SU!), Versamark
Stamps: Circle-A-Thon
Extras: Extra Thick Embossing Powder (SU!); Sequins ribbon (May Arts), 1 3/4 and 1 inch circle punchs (EK Success)

Saturday, October 30, 2010

To a Crafty Girl


I made this card for one of my crafty friends.  I took one of Hambly Studios new shimmer papers and clear embossed the bird and wing from Schlosser Designs Have a Tweet Day set to make a pattern on top of the shimmery script.  I misted the patter with Tatered Angels pink mist and wiped off the embossed bird.  I used the shimmery reverse side of the shimmery paper to create an accent bird and stamp the sentiment.  This way the entire focus of the card was shimmery.  The bird was stamped in Melon Mambo and clear embossed to make him stand out a little and popped up.  I stitched the rest of the card to draw the eye into the focal point.

Here is a close up so you can see the embossing.


I was planning on posting this sooner but I have been swamped at work and been sick - yuck!  I hope to get a little crafting in this weekend, since I am contagious and can't hang with my super cute niece on Halloween (my second fav holiday behind Christmas) :(

Have a great night!  Maybe I will post again tonight (shocker I know).

Supplies:
Paper: Pen & Ink Glimmer Screen Print Paper (Hambly Studios); Melon Mambo and Bermuda Bay cardstock (SU!)
Ink: Versamark, Melon Mambo Classic Ink (SU!)
Stamps: Have a Tweet Day (SD); Sentiment from Studio Style(PTI)
Extras: Chipboard Frame (American Crafts); Bling (Kaiser); Pink Glimmer Mist (Tattered Angels); Clear Embossing Powder (Ranger Ink)

Sunday, April 25, 2010

Celebrate Bling


I finally busted into my My Cute Stamps set, Celebrate Chandelier. I embossed the chandelier in white embossing powder on some Just Chillin' paper from Making Memories. I added bling to really make the chandelier sparkle, and to create a hanging effect I punched two holes aaround the top chain of the chandelier and tied a black ribbon and dangled the celebrate tag.

This was the perfect card for a friend, who is super fabulous and stylish. The stamp set really made this card, and you will definitely be seeing this set on the blog again.

Happy Sunday and enjoy the rest of your weekend.

Supplies:
Paper:
Basic Black and Basic Grey cardstock; Just Chillin' patterned paper (Making Memories
Ink: Versamark (Tsukineko); Tuxe)do Black (Momento)
Stamps: Celebrate Chandelier (My Cute Stamps)
Extras: hole punch (Chomper Cromper); White embossing powder (Stampendous); Bling (Mark Richards); Silver Cord (SU!); Black Ribbon (Target Club Wedd)

Thursday, April 8, 2010

Technique-y


Sorry I have been an absent blogger. Life has gotten in the way. I have been keeping up with the running and with Easter this last weekend. Any who......

Here is my Technique-y card. I needed to make a b-day card for my boyfriend's uncle so I decided to keep with the man colors and go techniquey. It is not really masculine, but it is not feminine either. I figured to go with a technique, since he won't be the one keeping the card...his stampin' wife will. I started out by stamping the text background in peeled paint. I embossed the leaf images over the text using clear embossing powder. Then I rubbed peeled paint, broken china, and shabby shutters distress ink over the entire image and spritzed the entire image with a little water. That is about all on this card.

Thanks for stopping by!

Supplies:
Paper:
Soft Suede cardstock (SU!); White cardstock (Neenah); Teal cardstock (Archiver's)
Stamps: Turning a New Leaf and Background Text (PTI); Sentiment (SU!)
Ink: Basic Black (SU!); Peeled Paint, Shabby Shutters, Broken China (Ranger Ink); Versamark (Tsukineko)
Extras: Hodgepodge Hardware (SU!); Ribbon (From my Stash); Clear Embossing Powder (Ranger Ink)